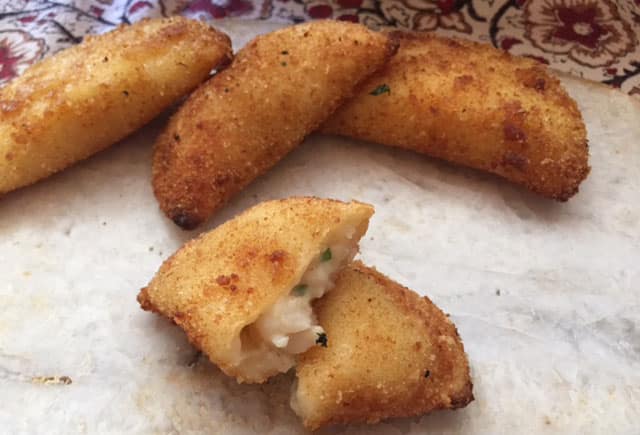
Rissóis de Camarão
Makes about 2 ½ to 3 dozen
Ingredients
For the filling:
- •30 ml (2 tablespoons) butter
- •60 ml (¼ cup) finely chopped onion
- •237 ml (1 cup) milk
- •7.5 ml (½ tablespoon) finely chopped cilantro or parsley
- •5 to 10 ml (1 to 2 teaspoons) hot pepper sauce, or to taste
- •2.5 ml (½ teaspoon) coarse salt or to taste
- •2.5 ml (½ teaspoon) ground white pepper
- •1.25 ml (¼ teaspoon) ground nutmeg
- •30 ml (2 tablespoons) cornstarch or flour
- •227 grams (8 ounces, about 1½ cups) peeled (shells reserved) and deveined, shrimp, cooked, well-drained, and coarsely chopped
For the pastry dough:
- •473 ml (2 cups) milk or broth (shrimp shells simmered in water 15 minutes then strained out)
- •57 grams (4 tablespoons) butter
- •5 ml (1 teaspoon) coarse sea salt
- •240 grams (2 cups) all-purpose flour
For assembly:
- •28 to 57 grams (2 to 4 tablespoons) soft warm butter
- •3 eggs, lightly beaten with 45 ml (3 tablespoons) water
- •Fine plain breadcrumbs


Preparation
For the filling: Melt the butter in a 946 ml (1-quart) saucepan. Add and fry the onion over medium-high heat until lightly golden, about 4 to 5 minutes.
Reduce the heat to medium-low, pour in the milk and heat to just scalding, not boiling. Stir in the cilantro, hot sauce, salt, pepper and nutmeg.
Combine the cornstarch with 30 ml (2 tablespoons) water and stir into the milk. Simmer, stirring constantly until it thickens, about 1 to 2 minutes. Do not overcook. Stir in the chopped shrimp, heat through for 1 minute, and remove from heat. Set aside to cool completely. The filling can also be made a day ahead and kept refrigerated until needed.
For the pastry dough: Combine milk or strained broth, butter, and salt in a 2 liter (2-quart) pot set over medium-high heat. Heat until scalding, not boiling. Reduce heat to medium-low.
Using a wooden spoon, vigorously stir the flour into the heated milk. Keep stirring until it pulls from the sides of the pot and forms a smooth dough. Remove pan from heat.
For assembly: While you can simply let the dough cool then roll out on a floured surface, cut discs, then fill and fold, the following method is what I like to use best. However for this method, it is important to use a warm surface like a wooden counter, a large cutting board, formica counter, or other warm non-stone cutting board.
Butter your work surface and dump the dough onto it. Using a light touch with a wooden or non-stick spatula, give the hot dough a few turns onto itself, kneading it briefly until fairly smooth. Do not overwork the dough. Divide the mound of dough in half, shaping each into a ball. Cover one of the balls on a separate cutting board with an inverted bowl to keep warm and reserve.
Shape the remaining ball of dough into a 10 to 12 cm (4 to 6 inch) diameter cylinder with the short end facing you. Using your warm rolling pin, without separating the dough from the cylinder, roll out enough of the short end of the dough towards you to about 12 cm (5 inches) in length and to .3 cm (1/8 inch) thick. Drop a scant 15 ml (1 tablespoon) of filling onto the center of the roll out. Fold the dough away from you, over the filling and press with your fingers to seal. Using an 8 cm (3-inch) diameter cutter, place it over the pressed edges but not the folded edge, cutting the rissoles into their half-moon shape. Any scraps can be re-folded into the cylinder.
Set aside the shaped rissoles on a lined tray. Working quickly to avoid the dough from cooling too much, repeat with all remaining dough. These can be made larger if desired, using a larger cutter and more filling. Once all the rissoles are formed, set up a bowl of egg wash and one of breadcrumbs. Dip each rissole, one at a time, into egg wash then coat with breadcrumbs, shaking off excess. Set back on tray without overlapping.
To cook, simply fry two to three at a time in hot vegetable or corn oil until golden. Serve hot or at room temperature. You can fry ahead, chill, then heat through in an oven if desired.
To freeze uncooked rissoles, set up a sheet pan with a sheet of plastic wrap extending over the edges, and a sheet of parchment paper on the plastic. Place breaded rissoles on sheet pan without overlapping them. Tightly double wrap with plastic wrap, then place into the freezer until needed. Once frozen, the rissoles can be transferred to a sealed plastic bag, but be sure to press as much air out as possible. These will keep up to 2 to 3 months. You can take out how many you need to fry for unexpected guests or cook them all up for a party. I usually remove frozen ones from the freezer about 15 minutes before frying them.

